Introduction
Automated Attendants, or Auto Attendants, are programmed answering services that greet and direct callers to the right person or location. Think of them as a 24/7 call monitor that can help your customers on a regular basis, when you can’t reach the phone, or during off-business hours. Sounds helpful, right?
To set up an Auto Attendant, follow this guide.
Create an Auto Attendant
Step 1: Log in to the Pilot Voice portal. Your Login Name will be in the format of extension@domain.
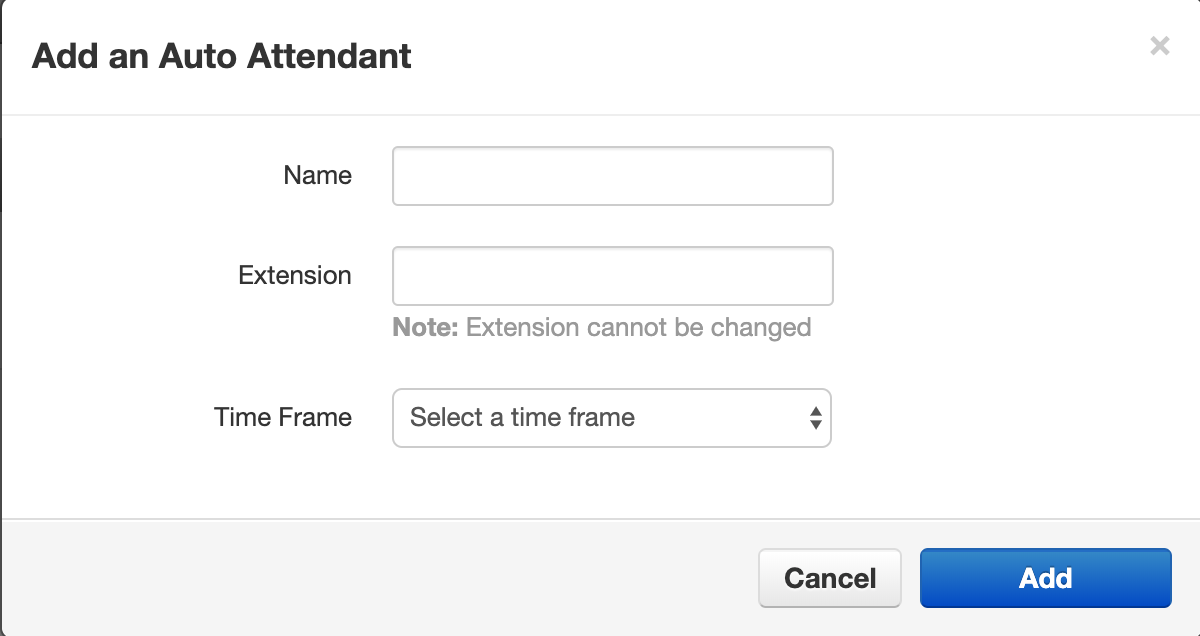
Step 2: Click Auto Attendant in the navigation bar. Then, you’ll see a pop up with empty fields to fill in for your Auto Attendant’s identity.
- Name: Enter any descriptive name. (Hint, start your name with AA so you recognize it later)
- Extension: Enter any unused extension number from 9000 to 9099
- Time Frame: Choose when you want the Auto Attendant to pick up. A best practice is to select default (all the time), and then use the Call Routing user to direct the call
- Click Continue when all fields are complete
Select Your Auto Attendant Options
Now that your Auto Attendant is on, it’s time to configure the options a caller may dial.
The options are:
- User: Transfer the call to any user or extension.
- Conference: Transfer the call to any conference bridge.
- Call Queue: Transfer the call to any call queue.
- Directory: Plays a company directory (anyone with the "List Directory" option enabled will be included)
- Voicemail: Sends call directly to a user's voicemail. (Do not use "Enable Enhanced Voicemail")
- Voicemail Management: Allows the caller to access a user's voicemail and change administrative options. This requires an extension number and password for access.
- Play Message: Plays a recorded message, then gives the option to transfer the caller
- Repeat Prompt: Repeats Menu Prompt
- Add Tier: Adds another level of Auto Attendant menus
- Options: Additional options. You must have the number options set and saved before setting these
- Dial by Extension: Allow callers to dial by extension
- No Option Chosen: Option to follow if no key is pressed
- Unassigned Key Pressed: Option to follow if a wrong key is pressed
Select the options you want to enable and click the Save button.
How to Set Up Auto Attendant Extension Options
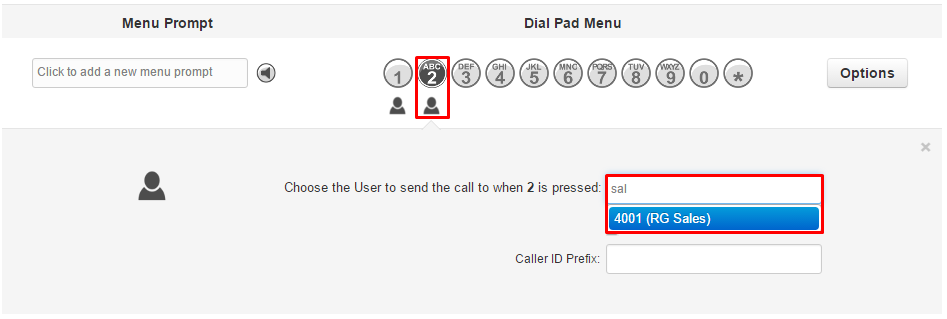
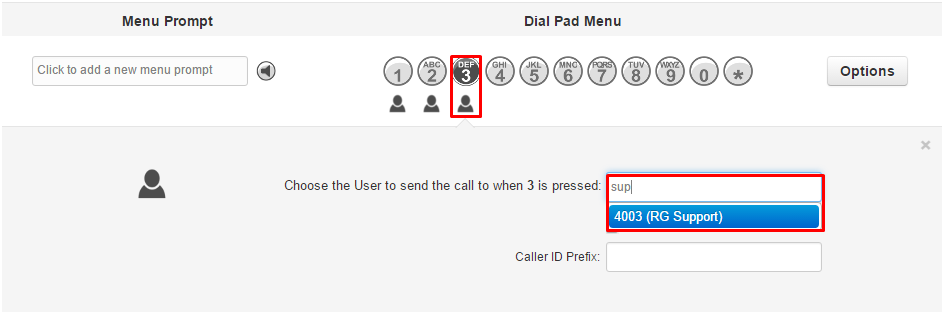
You’ll need to make sure the options in your recorded message send callers to the right place. For each option number mentioned in the Auto Attendant, assign the correct User (it will probably be a department) and number. Repeat this step for each option in your Auto Attendant menu.
Here’s what that would look like for the following script: “Thank you for calling the Pilot Demo Company. If you know the extension you'd like to reach, you can dial it at any time. For accounting, press 1. For sales, press 2. For support, press 3. To hear our company directory, press 9. Otherwise, please stay on the line and you’ll be connected with someone soon.”
Option 1: Select User. Then choose the extension for Accounting.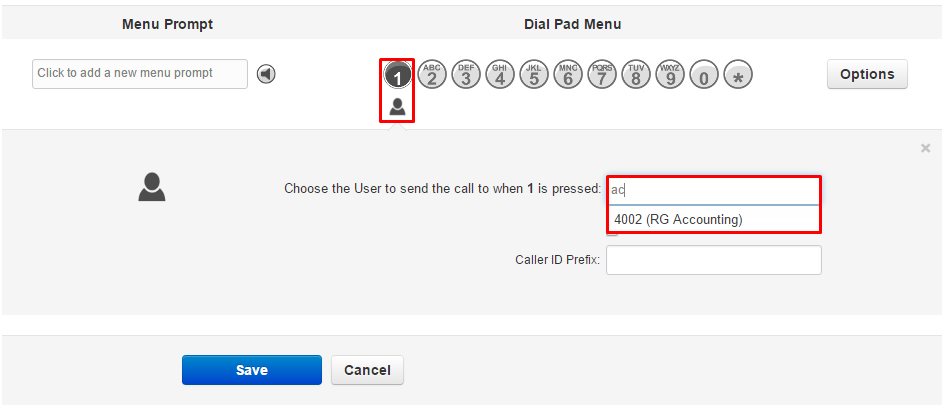
Option 2: Select User. Then choose the extension for Sales
Option 3: Select User. Then choose the extension for Support
Option 9: Select Directory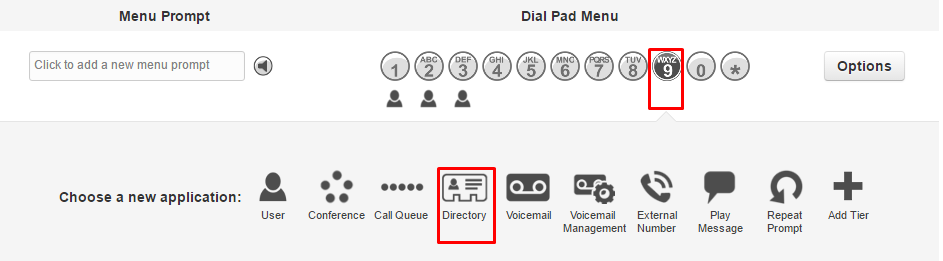
Finally, you should make sure to provide a catch-all option in case the caller doesn’t hear what they need from your primary menu. For all other options, it’s best to send users through to the directory.
Step 1: Click Options and check the box to Enable Dial By Extension.
Step 2: Set all remaining options to follow Option 9.
Step 3: Click Done, and then Save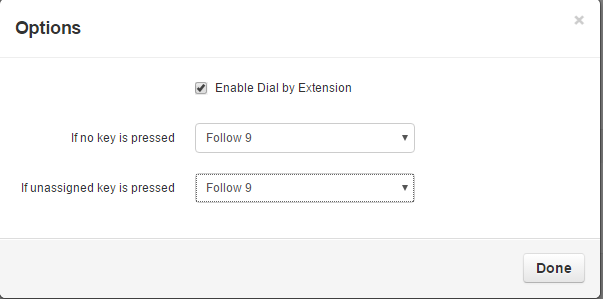
That’s it! Now your Auto Attendant is set up, and you can route a DID to your Pilot Voice Auto Attendant with this guide.
Make sure you have also created and added the corresponding voice greeting and menu options your callers will hear. Create an Auto Attendant recording using this guide.
